ことの発端
examplesを見ながらWebVRコンテンツをつくっていたのですが、コントローラーの「トリガー」「グリップ」を使うサンプルはあれど、「スティック」、「A」「B」「X」「Y」ボタンの取得の方法がわからなかったので、めちゃめちゃ調べた結果をまとめました。
結論
controllerModelFactory.createControllerModel
を実行した際に返ってくるモデルにmotionControllerがくっついているので、
controllerModel.motionController.data
にアクセスすれば、「トリガー」「グリップ」「スティック」「A」「B」「X」「Y」にアクセスできる。
ただし、正しい取得方法かは謎。
DEMO

「ENTER VR」を押下すると、目の前にコントローラー(1つのみ)の状態が表示されます。
ボタンを押すと目の前の情報が更新されます。
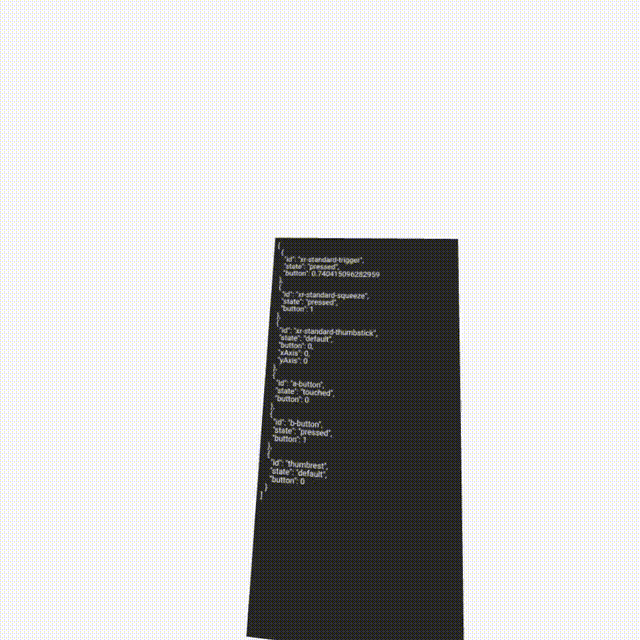
controllerModel.motionController.dataを肉眼で確認したところ、
[
  {
    "id": "xr-standard-trigger",
    "state": "default", // default | touched | pressed
    "button": 0 // 0 ~ 1
  },
  {
    "id": "xr-standard-squeeze",
    "state": "default", // default | touched | pressed
    "button": 0 // 0 ~ 1
  },
  {
    "id": "xr-standard-thumbstick",
    "state": "default", // default | touched | pressed
    "button": 0, // 0 | 1
    "xAxis": 0, // -1 ~ 1
    "yAxis": 0 // -1 ~ 1
  },
  {
    "id": "a-button", // 左のときは x-button
    "state": "default", // default | touched | pressed
    "button": 0 // 0 | 1
  },
  {
    "id": "b-button", // 左のときは y-button
    "state": "default", // default | touched | pressed
    "button": 0 // 0 | 1
  },
  {
    "id": "thumbrest", // ?
    "state": "default",
    "button": 0
  }
]
という値が入ってました。
ソースコード
<!DOCTYPE html>
<html>
<head>
  <meta charset="UTF-8" />
  <title>webvr controller</title>
  <style>
    #VRButton {
      background: #000 !important; // 見にくいので黒にする
    }
  </style>
</head>
<body>
  <script type="module">
    import * as THREE from './build/three.module.js';
    import { VRButton } from './jsm/webxr/VRButton.js';
    import { XRControllerModelFactory } from './jsm/webxr/XRControllerModelFactory.js';

    const canvas = document.createElement('canvas');
    const scene = new THREE.Scene();
    const camera = new THREE.PerspectiveCamera();

    const renderer = new THREE.WebGLRenderer({
      canvas,
      antialias: true
    });

    renderer.setClearColor(0xf8f8f8, 1);
    renderer.vr.enabled = true;

    const controllerModelFactory = new XRControllerModelFactory();
    const controllerGrip = renderer.xr.getControllerGrip(0);
    const controllerModel = controllerModelFactory.createControllerModel(controllerGrip);

    controllerGrip.add(controllerModel);

    // 公式に提供されているトリガー、グリップのコールバックイベント
    controllerGrip.addEventListener('select', (evt) => console.log(evt));
    controllerGrip.addEventListener('selectstart', (evt) => console.log(evt));
    controllerGrip.addEventListener('selectend', (evt) => console.log(evt));
    controllerGrip.addEventListener('squeeze', (evt) => console.log(evt));
    controllerGrip.addEventListener('squeezestart', (evt) => console.log(evt));
    controllerGrip.addEventListener('squeezeend', (evt) => console.log(evt));

    controllerGrip.addEventListener('end', (evt) => console.log(evt));

    scene.add(controllerGrip);

    renderer.setAnimationLoop(() => {
      renderer.render(scene, camera);

      if (debug && controllerModel.motionController) {
        // controllerModel.motionController.dataからgamepadの状態を取得
        debug.log(JSON.stringify(controllerModel.motionController.data, null, '  '));
      }
    });

    // VR空間にログを表示する仕組み
    const debug = (() => {
      const canvas = document.createElement('canvas');
      const ctx = canvas.getContext('2d');
      const fontSize = 24;
      const padding = 12;

      canvas.width = 600;
      canvas.height = 1200;

      const geometry = new THREE.PlaneGeometry(canvas.width / 100, canvas.height / 100);
      const texture = new THREE.CanvasTexture(canvas);
      const material = new THREE.MeshBasicMaterial({
        map: texture
      });
      const mesh = new THREE.Mesh(geometry, material);

      mesh.log = log;

      function log(text) {
        ctx.fillStyle = '#282828';
        ctx.fillRect(0, 0, canvas.width, canvas.height);
        ctx.fillStyle = '#f8f8f8';
        ctx.font = `${fontSize}px sans-serif`;

        text.split('\n').map((text, i) => {
          ctx.fillText(text, padding, padding + fontSize * (i + 1));
        })

        material.map.needsUpdate = true;
      }

      return mesh;
    })();

    debug.position.set(0, 0, -12);
    scene.add(debug);

    document.body.appendChild(VRButton.createButton(renderer));
  </script>
</body>
</html>
経緯
まずは、ドキュメントにヒントが無いかを探してみたんですが、パッとみた感じ見つからず、結局ソースコードを読みました。
まず、getControllerGripの処理を調べると、WebXRControllerのインスタンスを返していることがわかります。
this.getControllerGrip = function ( index ) {

  let controller = controllers[ index ];

  if ( controller === undefined ) {

    controller = new WebXRController(); // webXRControllerを返している
    controllers[ index ] = controller;

  }

  return controller.getGripSpace();

};
つぎに、WebXRControllerのupdateを見てみると、引数でinputSourceを受け取っていることがわかります。
update( inputSource, frame, referenceSpace ) {
このinputSourceの中身をconsole.logで確認したところ、
XRInputSource
Symbol(@@webxr-polyfill/XRInputSource): {impl: GamepadXRInputSource, gripSpace: XRSpace, targetRaySpace: XRSpace}
gamepad: (...)
gripSpace: (...)
handedness: (...)
profiles: (...)
targetRayMode: (...)
targetRaySpace: (...)
と、gamepadというオブジェクトが入っており、オブジェクトから「トリガー」「グリップ」「スティック」「A」「B」「X」「Y」の情報が読み取れたので、当初はここにdispatchを追加して取得しようと考えましたが、Three.jsのソースを編集するのは嫌なので諦めました。
で、xrInputSourceを取得する方法を探してみたところ、
class MotionController {
  /**
   * @param {Object} xrInputSource - The XRInputSource to build the MotionController around
   * @param {Object} profile - The best matched profile description for the supplied xrInputSource
   * @param {Object} assetUrl
   */
  constructor(xrInputSource, profile, assetUrl) {
MotionControllerというクラスを発見。
MotionControllerのインスタンスを生成しているところを探すと、
class XRControllerModelFactory {

	constructor( gltfLoader = null ) {

		this.gltfLoader = gltfLoader;
		this.path = DEFAULT_PROFILES_PATH;
		this._assetCache = {};

		// If a GLTFLoader wasn't supplied to the constructor create a new one.
		if ( ! this.gltfLoader ) {

			this.gltfLoader = new GLTFLoader();

		}

	}

	createControllerModel( controller ) {

		const controllerModel = new XRControllerModel();
		let scene = null;

		controller.addEventListener( 'connected', ( event ) => {

			const xrInputSource = event.data;

			if ( xrInputSource.targetRayMode !== 'tracked-pointer' || ! xrInputSource.gamepad ) return;

			fetchProfile( xrInputSource, this.path, DEFAULT_PROFILE ).then( ( { profile, assetPath } ) => {

				controllerModel.motionController = new MotionController(
					xrInputSource,
					profile,
					assetPath
				);
と、controllerModelのmotionControllerに代入されているところを発見。
という流れで、controllerModelFactory.createControllerModelで返ってくるモデルのmotionControllerにアクセスするという手法を取ることになった次第です。