赤外線カメラで再規制反射材を撮影して、再帰性反射材をトラッキングすることを目指しました。
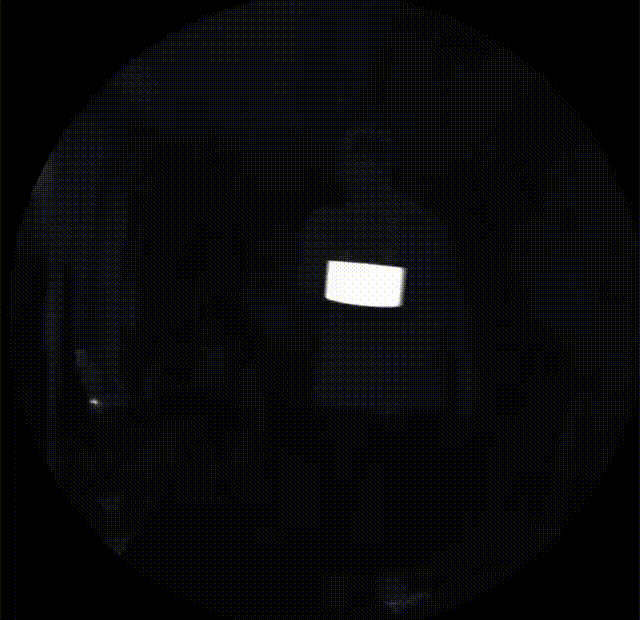
まず、こちらが赤外線カメラの前で再規制反射テープを振り回している映像です。
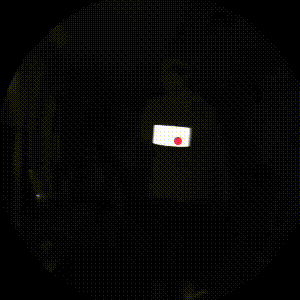
今回は、こちらの映像をCanvasにレンダリングした後、OpenCV.jsを使って、
❶ 二極化する
❷ 白い部分囲む長方形を作成する
❸ ❷で作成した長方形の左上の座標、X,Yを割り出す
❹ ❸で割り出したX,Yに❷で作成した長方形の幅の半分、高さの半分を足す
という処理を行い、再帰性反射テープをトラッキングしてみようと思います。
そして、いきなり結論ですが、Tracking.jsというクラスを作ってトラッキングしました。
Tracking.js
class Tracking {
  constructor({
    canvas, // トラッキングする映像を描画したcanvas
    min = 35,
    max = 255,
    isDebug = false
  }) {
    if (!canvas) {
      throw new Error('canvas is required');
    }

    if (min && typeof min !== 'number') {
      throw new Error('min must be of type number');
    }

    if (max && typeof max !== 'number') {
      throw new Error('max must be of type number');
    }

    this.canvas = canvas;
    this.ctx = canvas.getContext('2d');

    if (isDebug) {
      this.previewCanvas = document.createElement('canvas');
      this.previewCanvas.style.cssText = `
        position: fixed;
        top: 0;
        right: 0;
        transform-origin: top right;
        transform: scale(.5);
      `;

      document.body.appendChild(this.previewCanvas);
    }

    const script = document.createElement('script');
    const that = this;

    window.Module = {
      async onRuntimeInitialized() {
        await new Promise((resolve) => setTimeout(resolve, 100)); // 一瞬待たないとエラーになる
        that.cv = window.Module; // window.cvが展開されない環境があったためwindow.Moduleを代入
        that.srcMat = new that.cv.Mat(that.canvas.height, that.canvas.width, that.cv.CV_8UC4);
        that.distMat = new that.cv.Mat(that.canvas.height, that.canvas.width, that.cv.CV_8UC1);
        that.srcImg = that.cv.imread(that.canvas);
        that.contours = new that.cv.MatVector();
        that.hierarchy = new that.cv.Mat();
        that.minMat = that.cv.matFromArray(
          1,
          3,
          that.cv.CV_8UC1,
          [0, 0, min]
        );
        that.maxMat = that.cv.matFromArray(
          1,
          3,
          that.cv.CV_8UC1,
          [0, 0, max]
        );
      }
    };

    script.src = 'https://cdn.jsdelivr.net/npm/opencv-browser@1.0.0/opencv.js';
    document.body.appendChild(script);
  }

  getPosition(level = 0) {
    const position = {
      timestamp: Date.now(),
      x: null,
      y: null
    };

    if (!this.maxMat) {
      return position;
    }

    if (this.previewCanvas) {
      this.previewCanvas.width = this.canvas.width;
      this.previewCanvas.height = this.canvas.height;
    }

    this.srcMat.data.set(this.ctx.getImageData(0, 0, this.canvas.width, this.canvas.height).data);
    this.cv.cvtColor(this.srcMat, this.distMat, this.cv.COLOR_RGB2HSV_FULL);
    this.cv.inRange(this.distMat, this.minMat, this.maxMat, this.distMat);
    this.cv.medianBlur(this.distMat, this.distMat, level * 2 + 1);
    this.cv.imshow(this.canvas, this.distMat);
    this.cv.threshold(this.distMat, this.distMat, 127, 255, this.cv.THRESH_BINARY); // ❶ 二極化

    if (this.previewCanvas) {
      this.cv.imshow(this.previewCanvas, this.distMat);
    }

    try {
      this.cv.findContours(
        this.distMat,
        this.contours,
        this.hierarchy,
        this.cv.RETR_CCOMP,
        this.cv.CHAIN_APPROX_SIMPLE
      );

      const cnt = this.contours.get(0);
      const rect = this.cv.boundingRect(cnt); // ❷ 白い部分囲む長方形を作成する

      if (this.x !== null && this.y !== null) {
        this.x = rect.x + rect.width / 2; // ❸ ❹ 長方形の左上の座標、X,Yに幅の半分、高さの半分を加算
        this.y = rect.y + rect.height / 2; // ❸ ❹ 長方形の左上の座標、X,Yに幅の半分、高さの半分を加算

        position.x = this.x;
        position.y = this.y;
      }
    } catch (err) {
      console.error(err);
    }

    return position;
  }
}
使い方はこんな感じです。
index.js
const tracking = new Tracking({
  canvas: document.querySelector('canvas')
});

setInterval(() => {
  const { x: left, y: top } = tracking.getPosition(6); // 引数で大きな数字を渡すほどノイズに強くなるが負荷がかかるようになる

  console.log(x, y);
}, 1000 / 12);
取得した、x, yにDOMを移動してみるとこんな感じになります。
一瞬対象を見失ってしまう瞬間もありますが、概ねいい感じにトラッキングできています。
こちらをもうちょっと調整して、ボタンを押しているときだけ線を引けるようにしてみたDEMOがこちらです。
Azrue Kinectとマウスを使って、テニス選手がカメラにサインを書くみたいなことができる仕組みをつくりました。
— 君塚史高 (@ki_230) 2024年2月29日
名付けて、「KinecTennis」です。 pic.twitter.com/8kxTDJ4hK1
もともとは、M5StickC Plusをペンにしようと思って、UDP通信を調査していたのですが、マウスの方が早かったのでマウスを使いました。
今回は以上です。